Growing carrots used to frustrate me. I remember my first attempts—short, twisted roots, some barely thicker than a pencil. It felt like no matter what I did, something went wrong. That all changed when I switched to raised bed gardening.
Over time, I’ve learned that carrots are not difficult—they’re just very particular. Once I understood what they really needed, my harvests improved dramatically. Now, I consistently grow straight, sweet, and healthy carrots right from my raised beds.
In this guide, I’ll walk you through exactly how I do it, based on my own hands-on experience.
Why I Prefer Raised Beds for Carrots
The biggest turning point for me was realizing how important soil structure is for carrots. Since carrots grow underground, anything that blocks or compacts the soil can ruin their shape.
Raised beds solved several problems instantly:
- Better soil control
- Improved drainage
- Fewer rocks and compacted layers
- Easier maintenance
Instead of fighting with poor ground soil, I could create the perfect growing environment from scratch.
How I Prepare the Perfect Soil Mix
If there’s one thing I’ve learned, it’s this: soil is everything when growing carrots.
I aim for soil that is soft, loose, and deep. My go-to mix usually includes:
- 40% garden soil
- 40% compost
- 20% sand (for better drainage and looseness)
I make sure to remove any stones, roots, or debris. Even a small rock can cause carrots to fork or grow crooked.
Before planting, I loosen the soil at least 10–12 inches deep. This gives the carrots enough space to grow straight down.
Choosing the Right Carrot Variety
Not all carrots are the same, and I learned this the hard way. Some varieties grow better in shallow beds, while others need deeper soil.
Here are the types I’ve had success with:
- Nantes – sweet, cylindrical, and beginner-friendly
- Danvers – great for slightly heavier soils
- Short varieties – ideal if your bed isn’t very deep
When I was just starting, I stuck with shorter varieties to build confidence.
How I Plant Carrot Seeds (The Right Way)
Carrot seeds are tiny—like dust. My first mistake was planting them too deep and too close together.
Now, here’s my simple method:
- I create shallow rows about 1/4 inch deep
- I sprinkle seeds lightly along the row
- I cover them gently with fine soil
- I water carefully using a light spray
I’ve learned not to bury them too deep. Carrot seeds need light and consistent moisture to germinate.
Germination can take 1 to 3 weeks, so patience is key.
Watering: The Trick That Made a Huge Difference
This was one of my biggest lessons. Carrots need consistent moisture—but not too much.
What works for me:
- Light watering daily during germination
- Deep watering 2–3 times a week after seedlings establish
If the soil dries out too much, carrots can become tough or split. If it’s too wet, they may rot.
I always aim for soil that feels like a wrung-out sponge—moist, but not soggy.
Thinning: The Step I Used to Skip (Big Mistake)
In the beginning, I didn’t want to remove seedlings—it felt like wasting plants. But overcrowding leads to small, thin carrots.
Now, I always thin them properly:
- First thinning: when seedlings are 2 inches tall
- Final spacing: about 2–3 inches apart
It may feel harsh, but giving each carrot enough space makes a huge difference in size and quality.
Sunlight Requirements
From my experience, carrots grow best with at least 6 hours of sunlight daily.
I’ve tried growing them in partial shade, and while they still grew, they were slower and less sweet.
If you want the best results, give them as much sun as possible.
Common Problems I Encountered (And Fixed)
1. Forked or Twisted Carrots
This usually happened when my soil had rocks or wasn’t loose enough. Fix: better soil preparation.
2. Small Carrots
Caused by overcrowding or poor nutrients. Fix: proper thinning and adding compost.
3. Cracked Roots
Due to inconsistent watering. Fix: maintain steady moisture levels.
4. Slow Germination
Carrot seeds can be slow. I learned to keep the soil consistently moist and be patient.
Fertilizing: Keeping It Simple
I don’t overcomplicate feeding carrots.
Too much nitrogen leads to leafy tops but small roots. So instead, I:
- Mix compost into the soil before planting
- Avoid high-nitrogen fertilizers
- Use a balanced fertilizer lightly if needed
Honestly, good soil has been enough for me most of the time.
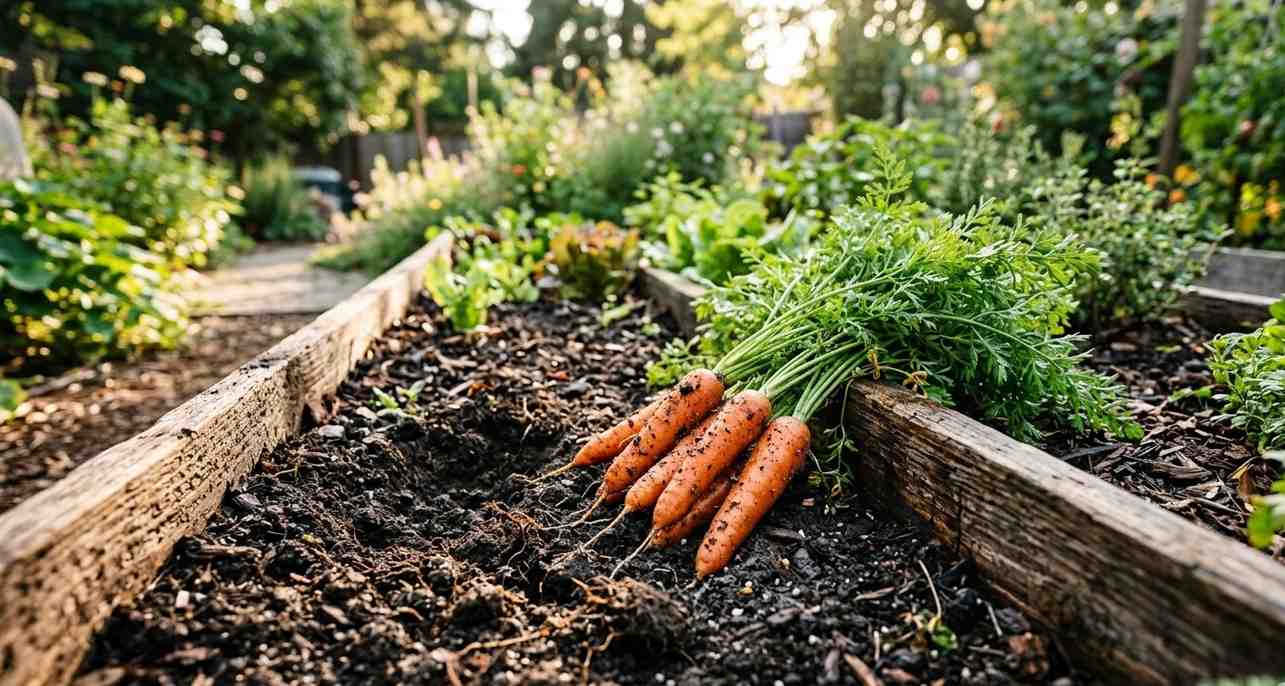
When and How I Harvest Carrots
This is the most satisfying part.
Depending on the variety, my carrots are usually ready in 60 to 80 days.
Here’s how I check:
- I look at the top of the carrot (should be about 1/2 to 1 inch wide)
- I gently pull one to test the size
When harvesting, I loosen the soil slightly and pull carefully to avoid breaking the roots.
My Personal Tips for Better Carrot Harvests
After multiple growing seasons, here are the tips that consistently worked for me:
- Always use loose, rock-free soil
- Don’t rush germination—be patient
- Thin seedlings properly (this is crucial)
- Keep watering consistent
- Choose the right variety for your bed depth
These simple habits made a noticeable difference in my results.
Growing carrots in raised beds completely changed my gardening experience. What once felt difficult is now one of the most rewarding crops I grow.
The key lesson I’ve learned is this: carrots don’t need complicated techniques—they just need the right conditions.
If you focus on soil quality, spacing, and consistent care, you’ll be surprised at how easy it becomes.
And trust me, there’s nothing quite like pulling a perfectly grown carrot from the soil—especially when you know you did everything right.